
Chef Freja
Andelår med Rødkål
Slow-roasted duck legs with crisp, deeply golden skin, served with braised red cabbage and caramelized potatoes. The weeknight Danish duck that proves the best part of the bird is the one that takes its time.
A cooking platform built around craft, culture, and the stories behind what we eat.
Created by Chef Freja
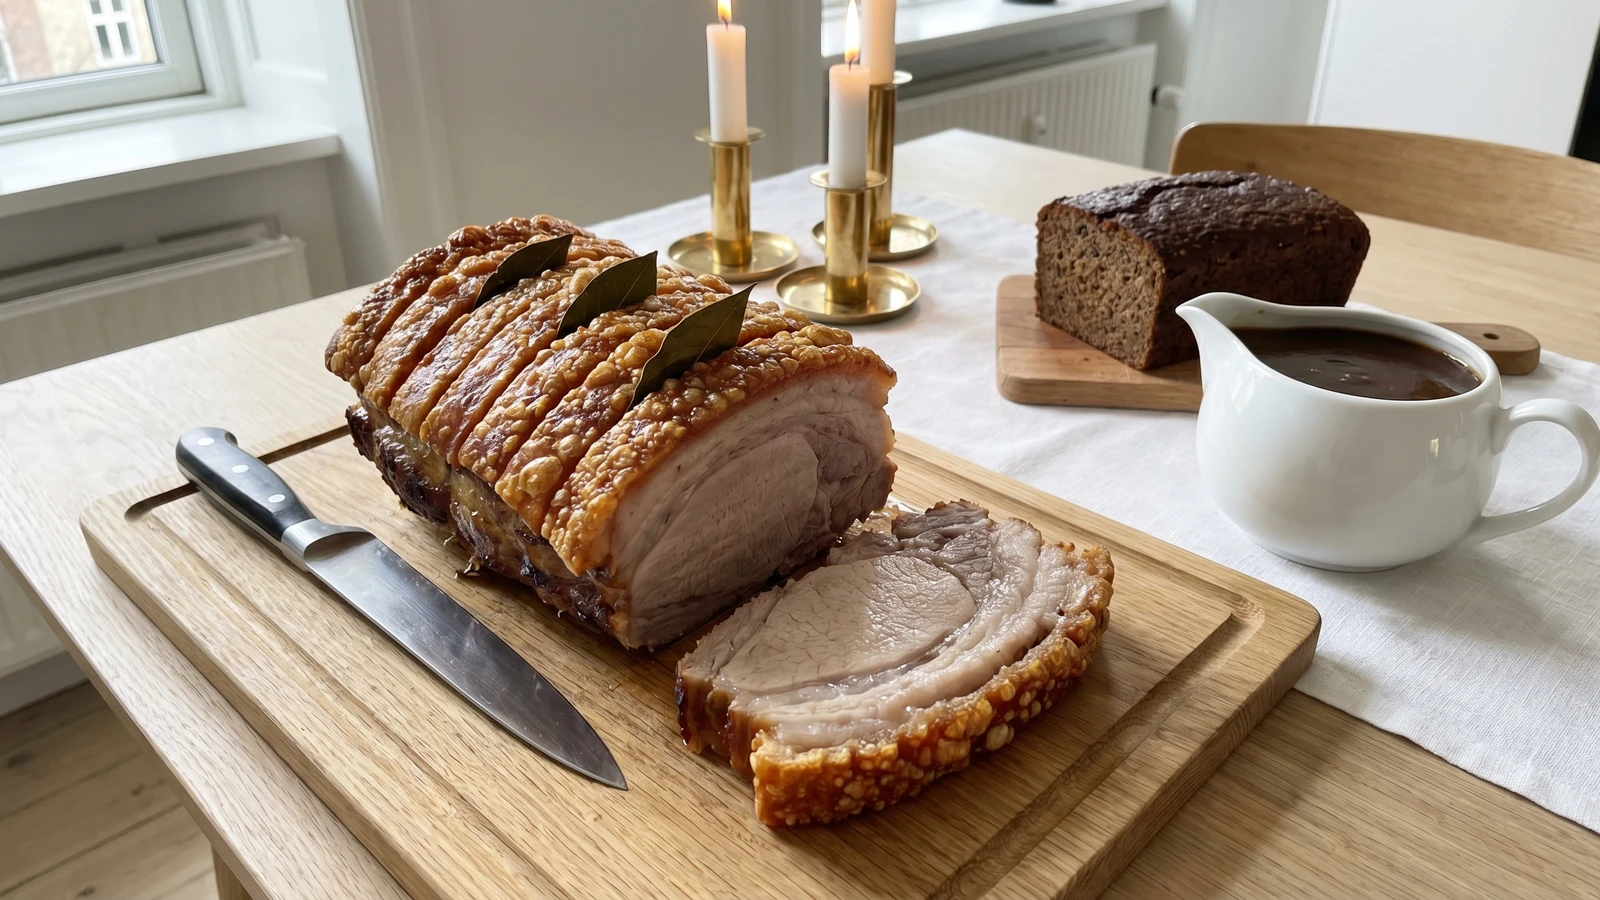
The pork belly roast that holds the center of juleaften. Rind scored tight and salted heavy, roasted hot then slow until the fat surrenders and the svaer pops golden and brittle across the whole surface.
December in Denmark is dark by three in the afternoon. The streets empty early, candles go into every window, and the whole country turns inward toward the kitchen. This is when ribbensteg begins to matter.
Ribbensteg is the roast that holds the center of juleaften, Christmas Eve, the most important meal of the Danish year. This is pork belly with its rind scored in tight parallel lines, packed with coarse salt, studded with bay leaves and cloves, and roasted until the fat melts away beneath the skin and the svaer (the crackling) pops into something golden and brittle that breaks apart under your teeth. The belly cut is fattier than the loin version of flaeskesteg, and that fat is your friend. It bastes the meat from the inside, keeps everything moist through the long roast, and gives you more room to get it right.
Three things decide whether your ribbensteg is good or great, and none of them happen in the oven. The rind must be scored in narrow, even lines without cutting through into the meat. The coarse salt must fill every groove and draw out moisture so the skin dries and blisters. And the bay leaves and cloves must be pressed into the cuts, where they release their oils slowly into the rendering fat. Get these right, and the oven does the rest. I'll walk you through every step, with the reasons behind each one, so that when you stand at your table on juleaften and lift the knife, you'll know exactly what you've done and why it worked.
Pork has been the defining meat of the Danish table for centuries, a natural consequence of the country's landscape where pig farming thrived in beech forests and on the grain-rich farms of Jutland and the islands. Ribbensteg became the established juleaften main course during the 19th century, gradually displacing older traditions of salted and boiled meats. The technique of scoring the rind for perfect svaer is passed down within families, and regional arguments about the correct width between score lines, whether bay leaf or not, whether beer in the roasting tin or water, remain among Denmark's most reliably heated December debates.
Quantity
2kg
bone-in, rind on, at room temperature
Quantity
3 tablespoons
Quantity
8
fresh or dried
Quantity
12
Quantity
1 teaspoon
lightly crushed
Quantity
500ml
for the roasting tin
Quantity
30g
for the gravy
Quantity
2 tablespoons
Quantity
500ml
Quantity
100ml
Quantity
to taste
for the gravy
Quantity
freshly ground, to taste
for the gravy
| Ingredient | Quantity |
|---|---|
| pork bellybone-in, rind on, at room temperature | 2kg |
| coarse sea salt | 3 tablespoons |
| bay leavesfresh or dried | 8 |
| whole cloves | 12 |
| whole black peppercornslightly crushed | 1 teaspoon |
| boiling waterfor the roasting tin | 500ml |
| unsalted butterfor the gravy | 30g |
| plain flour | 2 tablespoons |
| pork or chicken stock | 500ml |
| double cream (optional) | 100ml |
| fine sea saltfor the gravy | to taste |
| black pepperfor the gravy | freshly ground, to taste |
Place the pork belly rind-side up on a board. Using the sharpest knife you own (a utility knife or even a clean craft knife works well), score the rind in parallel lines about 1cm apart, running the full length of the belly. Cut through the rind and into the fat beneath, but stop before you reach the meat. You'll feel the resistance change when your blade moves from the firm rind into the softer fat. That's your depth. If you cut into the meat, the juices will escape during roasting and the flesh dries out. If you don't cut deep enough, the salt can't penetrate and the crackling won't pop.
Pour boiling water slowly over the scored rind. Watch the lines open and curl slightly apart. This is good. The hot water relaxes the rind and opens the grooves so the salt can reach deeper. Pat the rind completely dry with kitchen paper. This step is not optional. Any moisture left on the surface will steam in the oven instead of crisping, and steamed rind is tough, not brittle. Once the rind is dry, rub the coarse sea salt generously into every groove, pressing it in with your fingers. You want the salt filling those lines like grout between tiles. Use all three tablespoons. It looks like too much. It isn't. The salt draws moisture out of the rind during resting, and dry rind is the single most important condition for good svaer.
Tuck the bay leaves into the scored lines, spacing them along the length of the belly. Press a whole clove into every third or fourth groove. These aren't decoration. As the fat renders during roasting, it carries the oils from the bay and the cloves down into the meat. The result is a fragrance that fills your kitchen and a depth in the drippings that will make your brun sovs worth drinking. Scatter the crushed peppercorns over the underside of the meat (not the rind). Now let thebelly rest uncovered on a rack in the fridge for at least one hour. Overnight is better. Time and cold air do the same thing the salt is doing: they dry the rind, and dry rind is what gives you svaer that pops.
Heat the oven to 225C. Place a wire rack inside a deep roasting tin and pour 500ml of boiling water into the bottom of the tin. The water does two things: it stops the drippings from burning on the pan floor (you need those drippings for the gravy), and it creates a humid base that helps render the fat without drying out the meat. Set the pork belly rind-side up on the rack. The rind must sit above the water, never touching it. Roast at 225C for 25 minutes. This initial blast of high heat starts the crackling. You'll hear the rind begin to crackle and pop. That sound is the moisture escaping from the scored lines and the rind beginning to blister. Don't open the oven door. Let the heat do its work.
Lower the oven to 160C without opening the door if you can (set the dial and let it drop). Roast for a further two hours. This is the patient part, and the part where the belly cut rewards you. The fat beneath the rind renders slowly, basting the meat from the inside, while the low heat cooks the pork gently until it is tender all the way through. Check the water level in the tin at the halfway mark. If it has evaporated, add another 250ml of boiling water. The drippings collecting in the tin should be dark and rich. That is your gravy waiting to happen.
When the roast comes out, look at the rind. If the svaer has popped evenly across the whole surface, golden and brittle with every ridge standing sharp, you're done. If there are patches that haven't popped (this happens, it's not a failure), turn the oven up to 250C and return the pork for five to eight minutes, watching it closely. The difference between perfect and burnt is two minutes at this temperature. Listen for the crackling. When the popping slows and the whole surface looks like golden bark, pull it out. Transfer the roast to a warm serving board. Tent loosely with foil and let it rest for fifteen to twenty minutes. Resting lets the juices redistribute through the meat. If you carve too soon, those juices run onto the board instead of staying in every slice.
While the meat rests, pour the drippings from the roasting tin through a sieve into a jug. Let the fat rise to the top and skim off most of it (save it, it's extraordinary for roasting potatoes). Set the roasting tin over medium heat on the stovetop. Add the butter and let it melt, then stir in the flour. Cook the flour in the butter and drippings for two minutes, stirring constantly, until it smells biscuity and has turned a shade darker. This is your roux, the base of the gravy. Pour in the stock gradually, stirring as you go to prevent lumps. Add the skimmed drippings. Let it simmer for ten minutes until the gravy has thickened enough to coat the back of a spoon. Stir in the cream if you're using it. Season with salt and pepper. Taste it. Good brun sovs should be rich and meaty with a quiet warmth from the bay and cloves that cooked into the drippings. Strain into a warm jug.
Remove the bay leaves and cloves from the rind. Using a sharp, heavy knife, carve the ribbensteg into thick slices, cutting between the scored lines so each piece carries a strip of crisp svaer on top. The knife should crack through the crackling with a clean snap. Arrange the slices on a warm serving platter or bring the whole roast to the table on its board with the knife alongside and let everyone hear that snap for themselves. Pour the brun sovs into a jug and set it beside the platter. This is how we greet each other at juleaften. The table is where it happens.
1 serving (about 220g)
Culinary guides, cultural storytelling, and the editorial depth that makes cooking meaningful.
Discover Culinary ExplorerChef Freja
Slow-roasted duck legs with crisp, deeply golden skin, served with braised red cabbage and caramelized potatoes. The weeknight Danish duck that proves the best part of the bird is the one that takes its time.

Chef Freja
The whole roasted duck of juleaften, stuffed with tart apples and dark prunes, slow-roasted for four patient hours until the skin crackles like something earned and the meat underneath gives way without resistance.

Chef Freja
Whole sea trout baked with butter, lemon, and armfuls of dill, served beside the first nye kartofler of the season and a melting slab of dildsmor. The Danish summer table at its most generous.

Chef Freja
A side of salmon baked gently in butter and white wine, served warm with a bright dill cream sauce and the season's first nye kartofler. Late spring on a Danish table, cooked with love.