Culinary Explorer

A cooking platform built around craft, culture, and the stories behind what we eat.
Discover Culinary Explorer
Pan de Rancho Huasteco (Pan de Leña)

Pan de Rancho Huasteco (Pan de Leña)

Created by

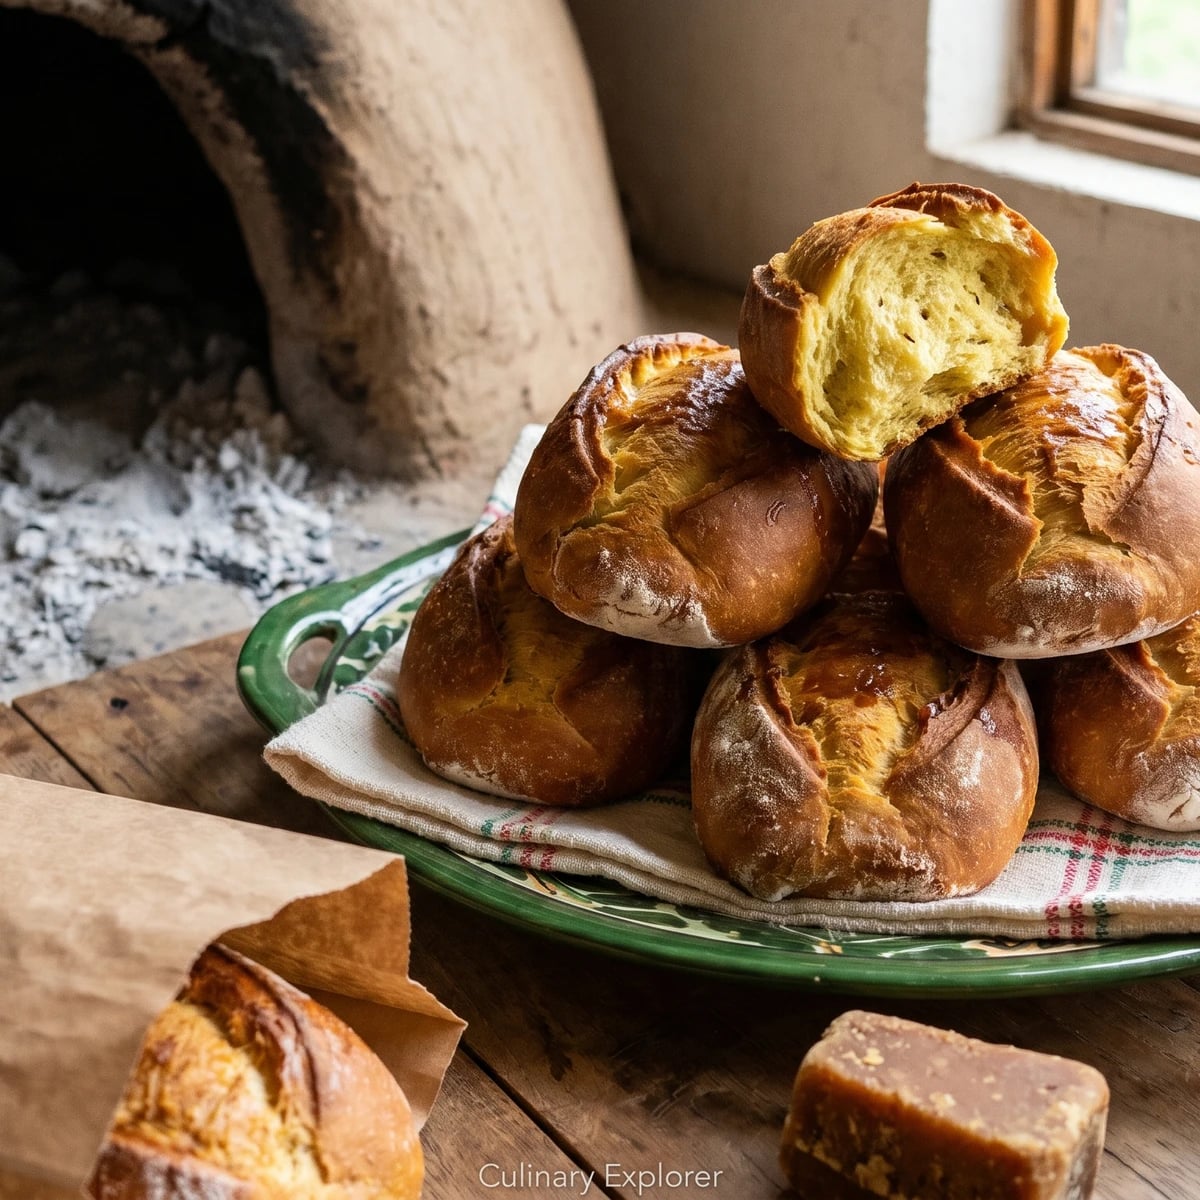
Veracruz's Huasteca pan de rancho, enriched with manteca de cerdo and piloncillo from cane country, fermented overnight and baked against the stored heat of a mud horno de leña.

Breads
Mexican
Special Occasion
Make Ahead
Comfort Food
1 hr
Active Time
2 hr cook15 hr total
Yield12 small loaves

Veracruz, the Huasteca Veracruzana in the north, from Tantoyuca and Chicontepec toward the hills above Tuxpan: this is where this pan de rancho lives. Not in a bakery window with colored sugar. In a patio, beside a horno de leña of mud and brick, where the oven is fired before sunrise and the bread goes in when the walls turn pale from stored heat.

The geography is in the dough. Piloncillo and panela come from the cañaverales, the cane fields that run through Veracruz. The fat is manteca de cerdo, because la manteca es el sabor, and the flour is wheat, a Veracruz inheritance from the port, Mexico's first Atlantic door. This is not a chile dish. Not every Mexican food needs chile to prove itself. The sweetness is dark, molasses-deep, and the crumb should pull apart soft but not cottony.

I learned this version from a señora outside Chicontepec who kept her levadura in a clay jar and tested her oven with a pinch of flour thrown onto the floor of the horno. If the flour browned too fast, she waited. If it sat there pale, she fed the fire again. No thermometer, no drama, just practice.

Make the levadura at night. Knead the manteca in after the flour has taken water. Give the dough time to wake up. No me vengas con atajos. Pan de leña tastes like patience, cane sugar, pork fat, and a wood oven doing its work.

Veracruz became the first Atlantic port of New Spain in 1519, when Villa Rica de la Vera Cruz opened the route through which wheat, sugar cane, and European baking techniques entered the Gulf coast. In the Huasteca Veracruzana, wheat bread settled into rural wood-fired ovens while local cane fields supplied piloncillo and panela, even as corn, including the Tuxpeño landrace of northern Veracruz, remained the daily staple. Veracruz has its own wheat-bread family, canilla, pambazo, pan de Xico, sweet cemita with piloncillo and nuts, and hojaldra with ajonjolí for Day of the Dead, which should not be confused with Puebla's sandwich cemita or Puebla's puff-pastry hojaldra.

The technique, the tradition, and the story behind every dish.

Discover Culinary Explorer

Ingredients

harina de trigo, for the overnight levadura

Quantity

1 cup (125 grams)

warm water

Quantity

3/4 cup

105F to 110F

active dry yeast

Quantity

1 teaspoon

piloncillo

Quantity

1 tablespoon

finely grated

harina de trigo

Quantity

5 cups (625 grams)

plus more for the table

granulated cane sugar

Quantity

1/2 cup (100 grams)

piloncillo or panela de caña

Quantity

1/2 cup (90 grams)

finely grated

whole milk

Quantity

1 cup

warm

large eggs

Quantity

2

room temperature

manteca de cerdo

Quantity

1/2 cup (100 grams)

softened, plus more for greasing

fine sea salt

Quantity

2 teaspoons

Mexican canela

Quantity

1 teaspoon

ground

anise seed

Quantity

1 teaspoon

lightly crushed

egg and milk varnish

Quantity

1 large egg beaten with 1 tablespoon whole milk

piloncillo or panela de caña, for final brush

Quantity

1/4 cup

finely grated

water, for final brush

Quantity

2 tablespoons

Equipment Needed

  • Horno de leña de barro or brick, or a baking stone or steel for a home oven
  • Large clay or ceramic bowl for fermenting the dough
  • Wooden table or broad board for kneading
  • Bench scraper
  • Pastry brush
  • Cloth-lined basket or hand-woven cotton servilleta for cooling and serving

Instructions

  1. 1

    Make the levadura

    The night before baking, mix 1 cup harina de trigo, warm water, active dry yeast, and 1 tablespoon grated piloncillo in a deep bowl. Cover with a cloth and leave at room temperature for 8 to 12 hours. By morning it should smell gently fermented, not sour, with bubbles across the surface. This is the small patience that gives the bread its flavor.

  2. 2

    Dissolve the piloncillo

    Warm the milk with the grated piloncillo just until the piloncillo melts. Do not boil it. Let it cool until it feels warm, not hot, against your wrist. Hot milk kills the yeast and then you will blame the recipe. The recipe did nothing wrong.

  3. 3

    Mix the dough

    In a large bowl, combine the 5 cups harina de trigo, cane sugar, salt, Mexican canela, and crushed anise seed. Add the overnight levadura, the warm piloncillo milk, and the 2 eggs. Mix with your hand or a wooden spoon until the flour takes up the liquid and you have a rough, sticky dough. Let it rest for 20 minutes so the flour hydrates before you start fighting it.

  4. 4

    Work in manteca

    Knead the dough on a lightly floured table for 5 minutes, then add the softened manteca de cerdo a spoonful at a time. The dough will look greasy and wrong before it comes together. Keep kneading. After 10 to 12 minutes it should turn smooth, elastic, and soft enough to press with one finger. La manteca es el sabor. Shortening gives you a dull bread. Use manteca.

    Add the manteca after the flour has absorbed water. If you add it too early, the fat coats the flour and the dough stays heavy.
  5. 5

    Ferment the dough

    Place the dough in a bowl lightly greased with manteca. Cover and let it rise in a warm place for 2 to 3 hours. Because this dough carries sugar, eggs, and lard, it will not race. It should look swollen and alive, and a finger pressed into it should leave a soft dent that slowly fills back in. The clock advises. The dough decides.

  6. 6

    Shape the panes

    Turn the dough onto the table and divide it into 12 equal pieces. Shape each piece into a tight round or short oval, tucking the edges underneath so the top stays smooth. Set them seam side down on lard-greased baking sheets or on floured wooden boards if you are baking in a horno de leña. Cover with a cloth and proof 60 to 90 minutes, until puffy and light to the touch.

  7. 7

    Fire the horno

    While the panes proof, fire the horno de leña with dry hardwood until the interior walls turn pale and the floor holds strong heat. Rake out the coals and sweep the floor clean with a damp cloth tied to a pole. Toss a pinch of flour onto the oven floor. If it blackens immediately, wait. If it browns in a few seconds, the oven is ready. No pine, no treated wood. The bread tastes what the oven burns.

    For a home oven, place a baking stone or steel on the center rack, preheat to 425F for 45 minutes, then lower to 375F before baking. It is a compromise, not an upgrade, but it works.
  8. 8

    Bake the bread

    Brush the tops with the beaten egg and milk varnish. Slash each round once or cut a shallow cross, just enough to guide the rise. Bake in the horno de leña for 18 to 25 minutes, turning once if the oven has a hot side. In a home oven, bake at 375F for 22 to 28 minutes. The crust should be deep golden with darker piloncillo edges, and the bottom should sound hollow when tapped.

  9. 9

    Brush and cool

    Simmer the 1/4 cup grated piloncillo with 2 tablespoons water for 2 minutes, just until glossy. Brush a thin coat over the hot bread. Do not drown it. You want a molasses gleam, not a sticky candy shell. Cool the panes on a cloth-lined basket so the bottoms stay tender. Eat warm with cafe lechero or keep for the next morning. Recetas probadas y garantizadas.

Chef Tips

  • Buy fresh manteca de cerdo from a carnicería if you can. The shelf-stable white bricks of hydrogenated shortening are not the same thing. They give structure but no soul. La manteca es el sabor.
  • Good piloncillo smells like cane, molasses, and smoke. If it smells dusty or tastes flat, your bread will taste flat. Si no conoces el mercado, no conoces la cocina.
  • The dough rises slowly because sugar, eggs, and lard slow the yeast. That is normal. Do not keep adding yeast like you are fixing a machine. Give it warmth and time.
  • A horno de leña is heated by stored heat, not an open flame. If flames are still licking the walls when you put the bread in, you are burning bread, not baking it.
  • If you use a home oven, preheat a baking stone hard and bake the loaves close together. You will not get the same clay-and-wood character, but you will get a good pan de rancho. A substitution is a compromise, not an upgrade.

Advance Preparation

  • The levadura must be started 8 to 12 hours before mixing the final dough. This is the overnight fermentation that gives the bread its character.
  • The shaped panes can be refrigerated overnight after shaping. Let them come back to room temperature and finish proofing before baking.
  • Baked pan de rancho keeps two days wrapped in a cotton cloth. Refresh it on a dry comal or in a low oven until the crust softens and the piloncillo scent comes back.
  • The piloncillo brush can be made three days ahead and refrigerated. Warm it before brushing so it spreads thinly.

Frequently Asked Questions

Nutrition Information

1 serving (about 126g)

Calories
330 calories
Total Fat
10 g
Saturated Fat
4 g
Trans Fat
0 g
Unsaturated Fat
5 g
Cholesterol
65 mg
Sodium
410 mg
Total Carbohydrates
55 g
Dietary Fiber
2 g
Sugars
21 g
Protein
8 g

Note: Chef personas and recipes are created with AI assistance. Cook with care: follow safe food-handling practices, check doneness with a thermometer when needed, and adapt for allergies and your kitchen.

Where cooking meets culture.

Culinary guides, cultural storytelling, and the editorial depth that makes cooking meaningful.

Discover Culinary Explorer

More from Veracruz Breads

Browse the full collection